Table of Contents
ToggleGreat speakers deserve a solid foundation. Most homeowners invest hundreds or thousands in a home theater system, then place their speakers on wobbly furniture or the floor, wondering why the sound falls flat. Speaker stands aren’t just furniture, they’re acoustic tools that isolate vibration, angle drivers toward listening positions, and stabilize expensive equipment. Whether you’re setting up a 5.1 surround system or upgrading bookshelf speakers, the right stands make a measurable difference. This guide covers stand types, essential features, placement strategies, and installation tips to help you get theater-quality audio without hiring a professional installer.
Key Takeaways
- Home theater speaker stands isolate vibration, improve tweeter alignment, and stabilize equipment—making them essential acoustic tools, not just furniture.
- Choosing the right speaker stands requires attention to weight capacity, base footprint stability, and proper tweeter height positioning (36–42 inches for seated listeners) to achieve optimal sound quality.
- Front left and right speakers should form an equilateral triangle with your listening position, with 10–20 degrees of toe-in angle to sharpen stereo imaging and vocal clarity.
- Filling speaker stands with sand or steel shot adds 10–20 pounds per stand and significantly reduces cabinet resonance for cleaner bass and more accurate midrange performance.
- Surround speaker stands should position channels 1–2 feet above ear level at 90–110 degrees (side) or 135–150 degrees (rear) from center, following Dolby and DTS standards for immersive audio.
Why Speaker Stands Matter for Your Home Theater
Placing speakers directly on shelves, TV consoles, or the floor creates three problems: cabinet resonance, poor tweeter alignment, and bass coupling that muddies low frequencies. Speaker stands solve all three.
Vibration isolation is the primary benefit. When a speaker fires, the cabinet vibrates. If that cabinet sits on a hollow shelf or flimsy table, the furniture resonates and colors the sound, usually adding boominess or rattles. Quality stands use mass-loaded bases (often sand- or shot-fillable) and dampening materials like rubber or foam to decouple the speaker from the floor or furniture. The result is cleaner bass and more accurate midrange.
Ear-level tweeter positioning improves stereo imaging and dialogue clarity. Tweeters are directional: even a few inches off-axis reduces high-frequency detail. Most home theater seating puts ears around 36–42 inches off the floor. Stands let you position bookshelf or satellite speakers so the tweeter aims directly at the listening position, which is critical for front left/right and center channels.
Surround speaker placement often requires stands to achieve the angles recommended by Dolby and DTS. Rear or side surrounds should sit 1–2 feet above ear level and slightly behind or beside the seating area. Wall-mounting works, but stands offer flexibility if you rearrange furniture or upgrade speakers.
Stands also protect gear. A heavy speaker on a narrow shelf is a tip hazard, especially in homes with kids or pets. A stable stand with a wide footprint and cable management reduces that risk.
Types of Home Theater Speaker Stands
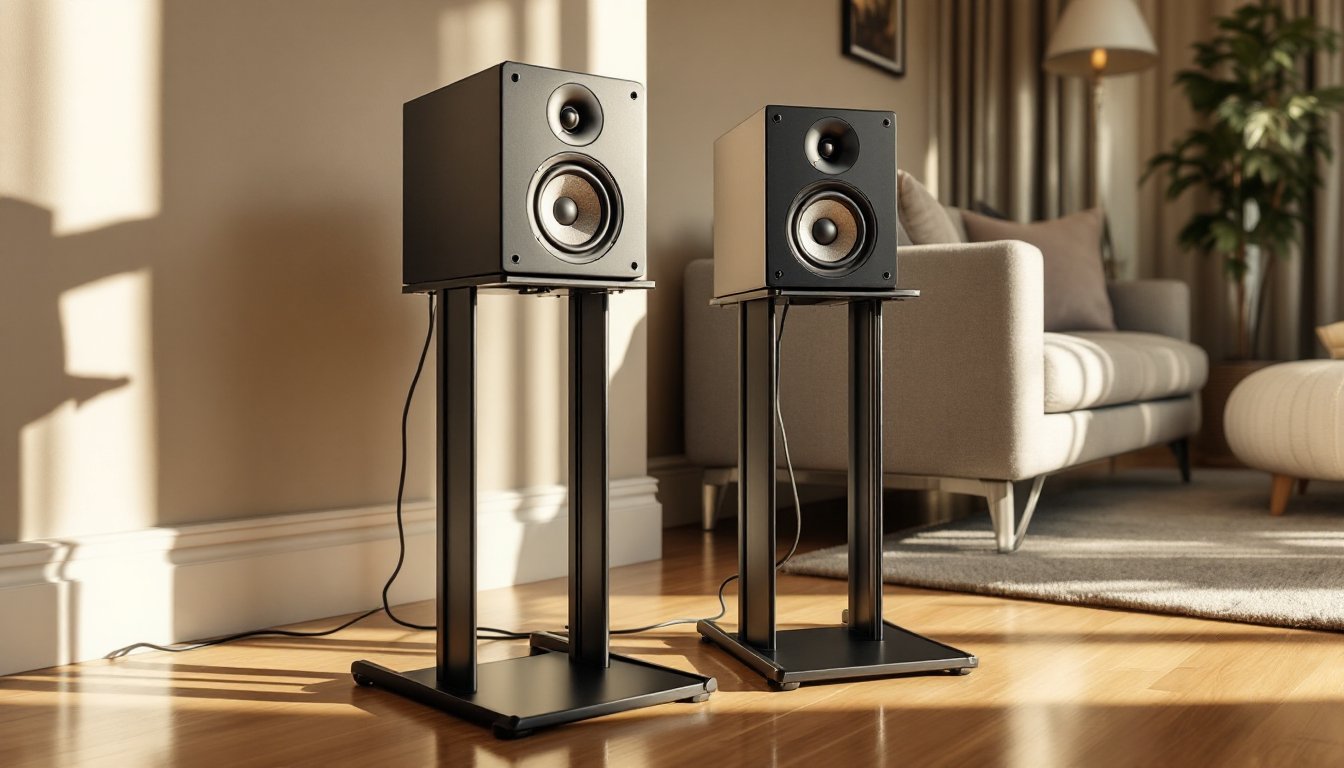
Floor Stands vs. Bookshelf Stands
Bookshelf speaker stands are designed for compact two-way or three-way speakers weighing 10–30 pounds. They typically range from 24 to 36 inches tall and have top plates sized for 6- to 8-inch speaker footprints. Look for stands with adjustable spikes or rubber feet, spikes penetrate carpet to anchor into the subfloor, while rubber feet protect hardwood and reduce vibration on concrete slabs.
Most bookshelf stands use a hollow center column that can be filled with sand, steel shot, or lead shot to increase mass and damping. A filled stand weighs 20–40 pounds and significantly reduces resonance compared to an empty one. Some higher-end models use cast iron or welded steel for inherent rigidity.
Floor-standing (tower) speakers usually don’t need stands, they have integrated plinths. But, aftermarket isolation platforms or outrigger feet can improve stability and decouple the speaker from the floor. If you’re using tower speakers as fronts in a home theater, focus your stand budget on the center and surrounds.
Satellite and Surround Sound Stands
Satellite speaker stands are lighter-duty designs for small, lightweight speakers common in home-theater-in-a-box (HTIB) systems. These stands often have thinner columns and smaller bases because satellites rarely exceed 5 pounds. They’re also typically height-adjustable via telescoping poles or threaded inserts, making them versatile for side or rear surround placement.
Many satellite stands include integrated cable channels to route speaker wire down the column and out through the base, keeping wires off the floor. This is a small detail that matters if you’re running a 5.1 or 7.1 setup without in-wall wiring.
Surround stand kits are sold in pairs and designed specifically for rear or side channels. They often come with wall-mount brackets as an alternative to floor placement. If your room layout puts the surround position 8–12 feet from the receiver, plan wire runs carefully, 16-gauge speaker wire is the minimum for runs over 50 feet, and 14-gauge is better for long distances or 4-ohm speakers.
Some setups use soundbar stands instead of traditional bookshelf or satellite configurations, particularly in compact rooms where a full speaker array isn’t practical.
Key Features to Look for When Buying Speaker Stands
Weight capacity is non-negotiable. Check the manufacturer’s rating and add a 25% safety margin. A stand rated for 20 pounds should not hold a 19-pound speaker, vibration and accidental bumps add dynamic load. Underrated stands wobble, sag, or tip.
Base footprint determines stability. A wider base (at least 8 × 10 inches for bookshelf speakers) lowers the center of gravity and resists tipping. Triangular or tripod bases are more stable than narrow rectangles, especially on carpet. If you have young kids or large pets, a wide, heavy base is mandatory.
Top plate size and mounting should match your speaker’s footprint. Some stands include adjustable mounting plates or threaded inserts for speakers with 1/4-20 or M6 mounting points on the bottom. Rubber or felt pads on the top plate prevent scratching and add a bit of damping. Avoid stands where the speaker overhangs the top plate, it looks precarious and is.
Cable management features include clips, channels, or hollow columns for routing wire. This won’t affect sound, but it makes installations look cleaner and reduces trip hazards. If you’re running HDMI or Ethernet alongside speaker wire, look for stands with dual channels or wider cable raceways.
Adjustability matters if you’re placing surrounds or have sloped floors. Threaded feet with locking nuts let you level each stand independently. Height-adjustable stands are useful for surround channels, but avoid designs with flimsy telescoping tubes, metal-on-metal contact can rattle during high-SPL passages.
Finish is mostly aesthetic, but textured black powder coat hides fingerprints and scratches better than gloss finishes. If the stands will be visible in a living room, product reviews often highlight finish quality and durability. Some manufacturers offer wood veneer or custom paint to match speaker cabinets.
How to Position Your Speaker Stands for Optimal Sound
Front left and right speakers should form an equilateral triangle with the primary listening position. If your couch is 9 feet from the screen, the speakers should be 9 feet from the couch and 9 feet apart from each other. Angle (toe-in) each speaker inward by 10–20 degrees so the tweeters aim at the listener’s head. This narrows the sweet spot but sharpens stereo imaging and vocal clarity.
Tweeter height should be 36–42 inches from the floor for seated listeners. Measure from the floor to your ear when seated, then adjust stand height so the tweeter is within 2–3 inches of that mark. If your speakers have a built-in tilt mechanism or you can angle the stand’s top plate, use it, even 5 degrees of upward tilt can compensate for low placement.
Distance from walls affects bass response due to boundary reinforcement. Speakers placed against a wall gain 3–6 dB of low-frequency output, which can sound boomy or muddy. Start with stands 2–3 feet from the front wall and adjust by ear. If bass sounds thin, move them closer: if it’s boomy, pull them out. Corner placement adds even more bass but often at the expense of clarity.
Surround speaker placement for a 5.1 system follows the standards tested by audio engineers and home theater reviewers: side surrounds should be 90–110 degrees from the center (slightly behind the seating), elevated 1–2 feet above ear level, and angled downward. Rear surrounds in a 7.1 setup sit 135–150 degrees from center. Use a tape measure and protractor if you want precision, most people eyeball it and adjust after listening.
Subwoofer interaction matters for front speakers. If your mains are crossed over at 80 Hz (common with AVRs), the sub handles deep bass and stand placement is less critical below that frequency. But if you’re running mains as “large” (full-range), stand placement affects how well they integrate with the sub. Experiment with sub phase and crossover settings after finalizing stand positions.
Safety and cables: secure speaker wire to the stand column with zip ties or adhesive clips. Loose wire is a trip hazard and looks sloppy. If you have toddlers, use safety straps (like furniture anchors) to secure tall stands to the wall, especially if the stand holds a heavy speaker on a narrow base.
DIY Speaker Stand Installation Tips
Filling the stands: Remove the top plate (usually four screws or a threaded collar) and pour fine-grade silica sand or steel shot into the column. Sand is cheap and effective: steel shot adds more mass but costs more. Fill to about 90% capacity, leaving room for a cap or foam plug at the top. Tap the stand on the floor a few times to settle the material, then top it off. Expect to add 10–20 pounds per stand. Wear a dust mask, sand is messy.
Leveling on carpet: Screw in carpet spikes (usually included) until they’re snug, then place the stand in position. Press down firmly so the spikes penetrate the carpet and contact the subfloor. Use a bubble level on the top plate and adjust individual spike heights by threading them in or out. Lock nuts or jam nuts prevent spikes from loosening over time.
Leveling on hard floors: Replace spikes with rubber or felt feet to protect the finish. If the floor is slightly uneven (common in older homes), adjustable feet with locking collars let you level each stand. Place a small level on the top plate and tweak each foot until the bubble centers.
Routing speaker wire: If the stand has an internal channel, thread the wire before filling with sand. Use a fish tape or stiff coat hanger wire to pull cable through if the channel is narrow. Exit the wire through a grommet or notch in the base, then run it along baseboards or under rugs to the receiver. Leave 6–12 inches of slack at the speaker end to allow repositioning.
Securing speakers to stands: If your speaker has threaded inserts on the bottom, use 1/4-20 or M6 screws (usually included with the stand) to bolt it down. Hand-tighten only, overtightening can crack MDF cabinets. If there are no inserts, use double-sided foam tape or Blu-Tack (poster putty) between the speaker and top plate. This provides grip and damping without permanent adhesive.
Safety check: After setup, gently push the top of each speaker sideways. It should resist tipping. If it rocks or feels unstable, widen the base, add more fill, or use furniture straps anchored to a wall stud. This is especially important if you have kids or pets.
Tools needed: Phillips screwdriver, hex keys (often included), level, tape measure, and a funnel (for sand). Optional: stud finder and drill if you’re adding safety straps.